PythonのOpenCVで画像を平行移動・線形変換・アフィン変換する方法を紹介する。
ここではcv2.warpAffine()を使い、画像を平行移動・線形変換・アフィン変換する。
この関数は、引数として画像(NumPy配列ndarray)と変換行列、出力サイズを渡して使用する。
関数と主な引数
cv2.wrapAffine(src, M, dsize)
| src | 画像(NumPy配列ndarray) |
| M | 画像変換に使用する変換行列 回転の場合は、cv2.getRotationMatrix2D() アフィン変換の場合は、cv2.getAffineTransform() によって簡単に変換行列を作成できる。 |
| dsize | 出力画像のサイズ (width, height) |
cv2.getRotationMatrix2D(center, angle, scale)
| center | 回転中心の座標 |
| angle | 回転する角度(反時計回り) angle=90 とすると、 反時計回りに90°回転になる |
| scale | 拡大・縮小の倍率 |
cv2.getAffineTransform(src, dst)
| src | 元画像上の3点の座標(3×2のndarray、float32形式にする) array([[ x1, y1], [ x2, y2], [ x3, y3]], dtype=float32) |
| dst | 上記の3点がアフィン変換で移動する座標(3×2のndarray、float32形式にする) array([[ x1′, y1′], [ x2′, y2′], [ x3′, y3′]], dtype=float32) |
画像の幾何変換について
画像の幾何変換は行列を用いて表すことができる。まずはその概要を紹介する。
平行移動
画像上の点\((x, y)\)が、点\((x’, y’)\)に平行移動するとき、以下のように表すことができる。ここで\((t_x, t_y)\)は、各軸方向の移動量である。
\(x’ = x + t_x\)
\(y’ = y + t_y\)
これを行列で表現するために、座標\((x, y)\)に対して要素を一つ増やした同時座標を導入する。すると以下のように表すことができる。
\(\left( \begin{matrix} x’ \\ y’ \\ 1 \end{matrix} \right) = \left( \begin{matrix} 1 & 0 & t_x \\ 0 & 1 & t_y \\ 0 & 0 & 1 \end{matrix} \right) \left( \begin{matrix} x \\ y \\ 1 \end{matrix} \right)\)
線形変換
画像上の点\((x, y)\)を点\((x’, y’)\)に線形変換するとき、以下のように行列で表すことができる。
\(\left( \begin{matrix} x’ \\ y’ \end{matrix} \right) = \left( \begin{matrix} a & b \\ c & d \end{matrix} \right) \left( \begin{matrix} x \\ y \end{matrix} \right)\)
線形変換には拡大・縮小、回転、スキューなどが含まれ、それらを表す変換行列は以下のようになる。
| 拡大・縮小 | \(\left( \begin{matrix} x’ \\ y’ \end{matrix} \right) = \left( \begin{matrix} s_x & 0 \\ 0 & s_y \end{matrix} \right) \left( \begin{matrix} x \\ y \end{matrix} \right)\) |
| 回転 | \(\left( \begin{matrix} x’ \\ y’ \end{matrix} \right) = \left( \begin{matrix} \cos\theta & -\sin\theta \\ \sin\theta & \cos\theta \end{matrix} \right) \left( \begin{matrix} x \\ y \end{matrix} \right)\) |
| スキュー (\(x\)軸方向) | \(\left( \begin{matrix} x’ \\ y’ \end{matrix} \right) = \left( \begin{matrix} 1 & \tan\theta \\ 0 & 1 \end{matrix} \right) \left( \begin{matrix} x \\ y \end{matrix} \right)\) 画像の\(y\)軸が\(x\)軸方向へ\(\theta\)傾く。 |
| スキュー (\(y\)軸方向) | \(\left( \begin{matrix} x’ \\ y’ \end{matrix} \right) = \left( \begin{matrix} 1 & 0 \\ \tan\theta & 1 \end{matrix} \right) \left( \begin{matrix} x \\ y \end{matrix} \right)\) 画像の\(x\)軸が\(y\)軸方向へ\(\theta\)傾く。 |
アフィン変換
アフィン変換は任意の線形変換と平行移動を組み合わせたもので、以下のように行列で表せる。
\(\left( \begin{matrix} x’ \\ y’ \\ 1 \end{matrix} \right) = \left( \begin{matrix} a & b & t_x \\ c & d & t_y \\ 0 & 0 & 1 \end{matrix} \right) \left( \begin{matrix} x \\ y \\ 1 \end{matrix} \right)\)
アフィン変換の中でも、特に回転と平行移動の組み合わせをユークリッド変換(Euclidean transformation)と呼んだり、回転と平行移動にさらに拡大・縮小を加えた組み合わせを相似変換(similarity transformation)と呼ぶこともある。
抽象的に解釈すると、アフィン変換は任意の平行四辺形から別の任意の平行四辺形への変換となる。
使用例
以下の風景写真を例に、使用例を示す。

先にライブラリのインポートと、写真の読み込みを行う。
Code:
import cv2
import matplotlib.pyplot as plt
import numpy as np

# 画像の読み込み
img = cv2.imread('./pic/landscape.jpg')
画像をcv2.wrapAffine()で平行移動
平行移動する場合は、平行移動の変換行列を作成して第2引数に指定する。また、第3引数には出力画像のサイズをタプル型で指定する必要がある。
Code:
# 画像の高さ、横幅、チャネル数を取得
rows,cols,cha = img.shape

# 変換行列を作成(x軸方向に100pix, y軸方向に50pix移動)、適用
M = np.float32([[1,0,100], [0,1,50]])
img_trans = cv2.warpAffine(img, M, (cols,rows))

# 変換画像の表示
plt.imshow(cv2.cvtColor(img_trans, cv2.COLOR_BGR2RGB))
plt.show()

# 変換行列の表示
print('変換行列:')
print(M)
Output:
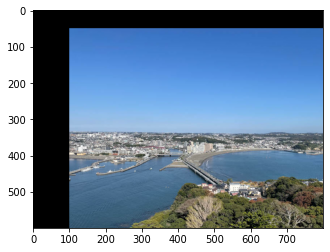
変換行列:
[[  1.   0. 100.]
 [  0.   1.  50.]]
画像をcv2.wrapAffine()で線形変換
拡大(縮小)
拡大(縮小)する場合は、拡大(縮小)の変換行列を作成して第2引数に指定する。変換行列は2×3行列でないとエラーとなる。また、第3引数には出力画像のサイズをタプル型で指定する必要がある。
Code:
# 画像の高さ、横幅、チャネル数を取得
rows,cols,cha = img.shape

# 変換行列を作成(1.5倍に拡大)、適用
M = np.float32([[1.5,0,0],[0,1.5,0]])
img_trans = cv2.warpAffine(img,M,(cols,rows))

# 変換画像の表示
plt.imshow(cv2.cvtColor(img_trans, cv2.COLOR_BGR2RGB))
plt.show()

# 変換行列の表示
print('変換行列:')
print(M)
Output:
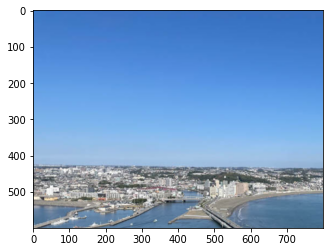
変換行列:
[[1.5 0.  0. ]
 [0.  1.5 0. ]]
回転
回転する場合は、回転の変換行列を作成して第2引数に指定する。これは、cv2.getRotationMatrix2D()を用いて簡単に作成することができる。ここでは、画像の中心を回転中心として反時計回りに90°回転させ、画像のスケールは等倍の変換行列を作成する。また、cv2.warpAffine()の第3引数には出力画像のサイズをタプル型で指定する必要がある。
Code:
# 画像の高さ、横幅、チャネル数を取得
rows,cols,cha = img.shape

# 変換行列を作成、適用
M = cv2.getRotationMatrix2D((cols/2,rows/2),90,1)
img_trans = cv2.warpAffine(img,M,(cols,rows))

# 変換画像の表示
plt.imshow(cv2.cvtColor(img_trans, cv2.COLOR_BGR2RGB))
plt.show()

# 変換行列の表示
print('変換行列:')
print(M)
Output:
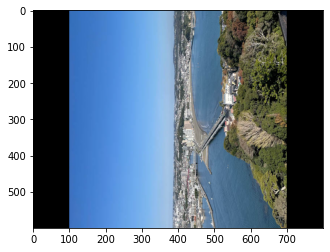
変換行列:
[[ 6.123234e-17  1.000000e+00  1.000000e+02]
 [-1.000000e+00  6.123234e-17  7.000000e+02]]
スキュー(x軸方向)
スキューの変換行列を作成して第2引数に指定する。変換行列は2×3行列でないとエラーとなる。また、第3引数には出力画像のサイズをタプル型で指定する必要がある。
Code:
import math

# 画像の高さ、横幅、チャネル数を取得
rows,cols,cha = img.shape

# 変換行列を作成、適用
b = math.tan(math.radians(15))
M = np.float32([[1,b,0],[0,1,0]])
img_trans = cv2.warpAffine(img,M,(cols + int(rows*b),rows))

# 変換画像の表示
plt.imshow(cv2.cvtColor(img_trans, cv2.COLOR_BGR2RGB))
plt.show()

# 変換行列の表示
print('変換行列:')
print(M)
Output:
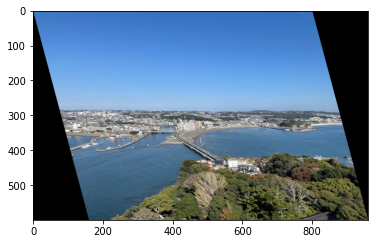
変換行列:
[[1.        0.2679492 0.       ]
 [0.        1.        0.       ]]
画像をcv2.wrapAffine()でアフィン変換
アフィン変換する場合は、変換前、変換後の3点の座標を決める必要がある。ここでは変数src_pts, dst_ptsに3×2のndarrayとして設定する。変換前の画像に、src_ptsの3点をプロットして確認する。
Code:
# 変換前、変換後の3点の座標を設定する
src_pts = np.array([[200, 200], [600, 200], [200, 400]], dtype=np.float32)
dst_pts = np.array([[150, 150], [550, 300], [300, 350]], dtype=np.float32)

img_marked = img.copy()

# 画像上にsrc_ptsの3点をプロット
for pt in src_pts:
    cv2.drawMarker(img_marked, tuple(pt.astype(int)), (0, 0, 255), thickness=4)

# 画像の表示
plt.imshow(cv2.cvtColor(img_marked, cv2.COLOR_BGR2RGB))
plt.show()
Output:
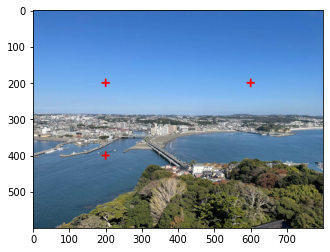
アフィン変換の変換行列は、cv2.getAffineTransform()を用いて簡単に作成することができる。引数にsrc_pts, dst_ptsを指定して変換行列を作成し、cv2.warpAffine()の第2引数に指定する。また、cv2.warpAffine()の第3引数には出力画像のサイズをタプル型で指定する必要がある。
Code:
# 画像の高さ、横幅、チャネル数を取得
rows,cols,cha = img.shape

# 変換行列を作成、適用
M = cv2.getAffineTransform(src_pts, dst_pts)
img_affine = cv2.warpAffine(img_marked, M, (cols, rows))

# 変換画像の表示
plt.imshow(cv2.cvtColor(img_affine, cv2.COLOR_BGR2RGB))
plt.show()

# 変換行列の表示
print('変換行列:')
print(M)
Output:
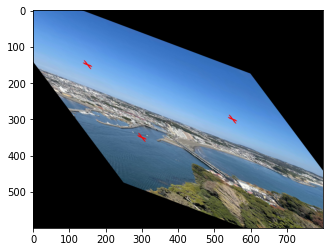
変換行列:
[[   1.       0.75  -200.   ]
 [   0.375    1.    -125.   ]]
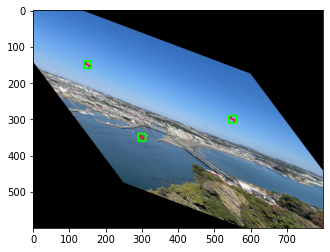
アフィン変換後の画像にdst_ptsの3点をプロットして、変換後のsrc_ptsの3点と一致していることを確認する。
Code:
# 画像上にdst_ptsの3点をプロット
for pt in dst_pts:
    cv2.drawMarker(img_affine, tuple(pt.astype(int)), (0, 255, 0), thickness=4, markerType=cv2.MARKER_SQUARE)

# 画像の表示
plt.imshow(cv2.cvtColor(img_affine, cv2.COLOR_BGR2RGB))
plt.show()
Output:


コメント