手軽にwebアプリケーションが作成できるStreamlitを使用して、OpenCVで画像の2値化処理をするアプリケーションを作成しました。今回は、ローカル環境のDocker上でDocker Composeを使用して稼働させるところまでを確認しています。以下にコードと実行結果を紹介します。
ディレクトリ構成
.
├── Dockerfile
├── docker-compose.yml
├── requirements.txt
└── test.py
アプリ作成
イメージのもとになるDockerfileは以下の通りです。
FROM python:3.9
USER root

EXPOSE 8501

WORKDIR /app
COPY ./requirements.txt requirements.txt
COPY ./test.py test.py

RUN pip install --upgrade pip
RUN pip install -r requirements.txt

CMD streamlit run test.py
docker-composeファイルの設定は以下の通りです。ここで、
stdin_openは標準入出力とエラー出力をコンテナに結びつける設定です。
docker run -it の-iオプションにあたる設定です。
ttyは擬似端末(キーボードによる入力)をコンテナに結びつける設定です。
docker run -it の-tオプションにあたる設定です。
version: '3'
services:
  stream01:
    image: streamlit
    build: .
    container_name: 'stream01'
    tty: true
    stdin_open: true
    ports:
      - 8501:8501
Pythonでインストールするライブラリは以下のrequirements.txtにまとめました。
numpy==1.22.3
Pillow==9.1.0
streamlit==1.10.0
opencv-python-headless==4.6.0.66この際、opencv-pythonをpipで入れるとtest.pyを実行した際に以下のエラーが出るため、opencv-python-headlessを入れています。(参考:https://itsmycode.com/importerror-libgl-so-1-cannot-open-shared-object-file-no-such-file-or-directory/)
ImportError: libGL.so.1: cannot open shared object file: No such file or directorywebアプリケーションのtest.pyは以前と同じです。
import os

import streamlit as st
import numpy as np
from PIL import Image
import cv2


def pil2cv(image):
    ''' PIL型 -> OpenCV型 '''
    new_image = np.array(image, dtype=np.uint8)
    if new_image.ndim == 2:  # モノクロ
        pass
    elif new_image.shape[2] == 3:  # カラー
        new_image = cv2.cvtColor(new_image, cv2.COLOR_RGB2BGR)
    elif new_image.shape[2] == 4:  # 透過
        new_image = cv2.cvtColor(new_image, cv2.COLOR_RGBA2BGRA)
    return new_image

def main():
    os.makedirs('./data', exist_ok=True)
    st.set_page_config(page_icon="📷", page_title="画像2値化アプリ")

    with st.sidebar:
        th = st.slider('Threshold value', 0, 255, 125)
        st.write("Threshold value", th)

    with st.sidebar:
        radio = st.radio(
            "Choose a binary method",
            ("Threshold", "Adaptive threshold mean","Adaptive threshold Gaussian",
            "Otsu' thresholding", "Otsu's thresholding + Gaussian fileter")
        )

    st.title('画像2値化アプリ')

    # アップローダー
    uploaded_image=st.file_uploader("以下からファイルアップロード", type=['jpg','png'])
    # カラム設定
    col1, col2 = st.columns(2)

    col1.header("Original image")
    col2.header("Binary image")

    # original画像表示、2値化処理
    with col1:
        if uploaded_image is not None:
            image=Image.open(uploaded_image,)
            img_array = np.array(image)
            st.image(img_array,use_column_width = None)
            img=pil2cv(image)

            gray = cv2.cvtColor(img,cv2.COLOR_BGR2GRAY)
            ret,th1 = cv2.threshold(gray,th,255,cv2.THRESH_BINARY)
            th2 = cv2.adaptiveThreshold(gray,255,cv2.ADAPTIVE_THRESH_MEAN_C,
            cv2.THRESH_BINARY,11,2)
            th3 = cv2.adaptiveThreshold(gray,255,cv2.ADAPTIVE_THRESH_GAUSSIAN_C,
            cv2.THRESH_BINARY,11,2)
            ret2,th4 = cv2.threshold(gray,0,255,cv2.THRESH_BINARY+cv2.THRESH_OTSU)
            blur = cv2.GaussianBlur(gray,(5,5),0)
            ret3,th5 = cv2.threshold(blur,0,255,cv2.THRESH_BINARY+cv2.THRESH_OTSU)

    # binary画像表示、保存
    if radio=="Threshold" and uploaded_image is not None:
        col2.image(th1)
        cv2.imwrite('./data/image.png', th1)
    elif radio=="Adaptive threshold mean" and uploaded_image is not None:
        col2.image(th2)
        cv2.imwrite('./data/image.png', th2)
    elif radio=="Adaptive threshold Gaussian" and uploaded_image is not None:
        col2.image(th3)
        cv2.imwrite('./data/image.png', th3)
    elif radio=="Otsu' thresholding" and uploaded_image is not None:
        col2.image(th4)
        cv2.imwrite('./data/image.png', th4)
    elif radio=="Otsu's thresholding + Gaussian fileter" and uploaded_image is not None:
        col2.image(th5)
        cv2.imwrite('./data/image.png', th5)

    # ダウンロードボタン作成
    if uploaded_image is not None:
        col2.download_button('Download',
            open('./data/image.png', 'br'),
            file_name='image.png')


if __name__ == '__main__':
    main()
実行結果
以下のコマンドを実行します。docker-composeファイルにポート接続などのオプションを記述しているので、Dockerのみの場合に比べてコマンドが簡潔になっています。
# docker-compose.ymlの設定に従ってimageをビルド、コンテナの起動
docker compose up -d --build
その他の基本的なコマンドは以下の通り
# imageの一覧を表示
docker image ls
# 稼働中のコンテナ一覧
docker ps
# コンテナ内のbashシェルを起動
docker compose exec stream01 bash
# コンテナ内のbashシェルを終了
exit
# コンテナの削除
docker compose down
# imageの削除
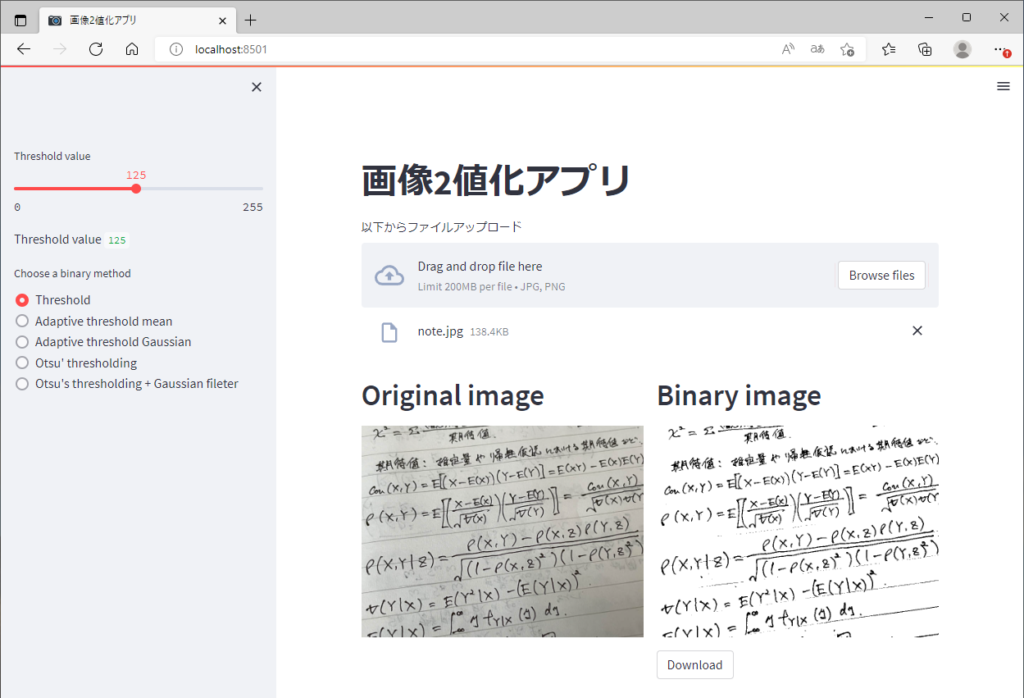
docker image rm streamlitコンテナ起動後、ブラウザからhttp://localhost:8501にアクセスするとアプリに接続できます。
実際のアプリ画面
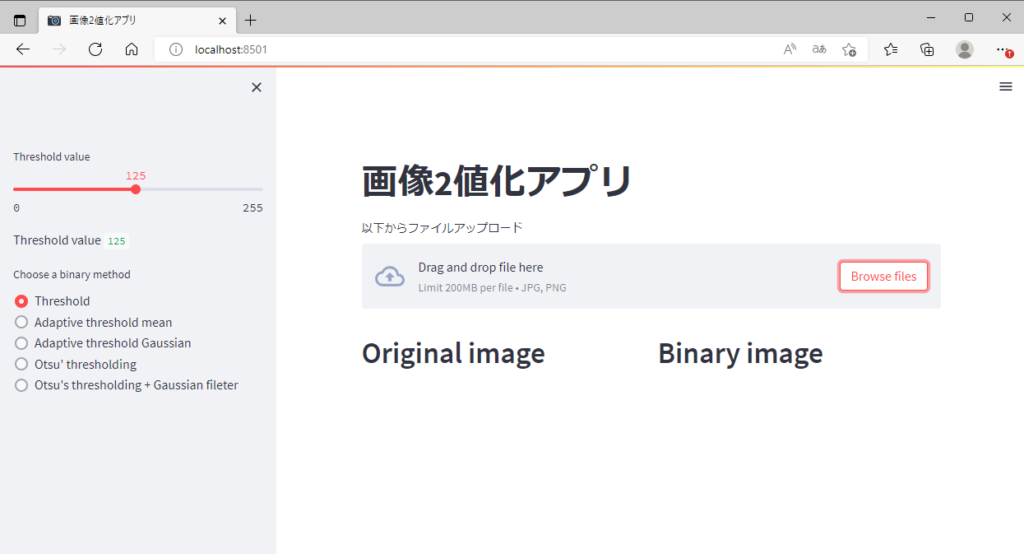
Browse filesからの画像をアップロードも実行できた。
まとめ
以上、Streamlitを使用したアプリケーションをDocker上でDocker Composeを使用して稼働させ、アクセスできることを確認しました。Docker Composeを使用することで、イメージのビルドとコンテナ起動を同時にでき、オプションの設定も簡潔にできることが分かりました。
また、本来Docker Composeは複数コンテナを管理するためのツールのなので、今後はそういった使い方の確認もしていきたいと思います。
本アプリケーションについては、最終的にはサーバー上での実行を目指していきます。
コメント